Getting shell access
Login credentials
HemiStereo devices can be accessed using the following credentials:
Username: |
hemistereo |
Password: |
hemistereo |
Note
The hemistereo user is part of the sudo group which allows you to gain root
access using sudo <command>.
Local access
For local access, connect a screen to the HDMI port and a keyboard to the USB port. A login prompt will be displayed on the screen which allows you to gain access to the device.
Remote access
The sensor can be access via remote “secure shell” access. Here, you are
presented an Ubuntu-Linux based command line for administrative tasks. Full
root access is granted via the sudo command.
The ssh access requires a functional network or micro-USB connection to
the sensor. If this is not configured correctly automatically, please refer to
the respective section on
how to set it up manually.
ssh hemistereo@<ip-address>
Under Linux, ssh usually is available per default on the virtual terminal application, on recent Windows versions, the ssh tool is also available throught the “cmd” terminal. Also dedicated tools exist.
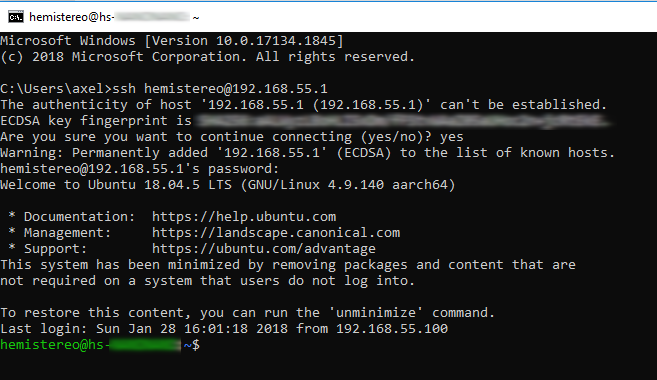
Figure: Micro-USB setup windows: use “cmd” command line tool and “ssh” command for connecting to the sensor. If this is not available, please consider to use a dedicated tool, e.g. putty or WinSCP.
Network configuration
System default
The sensor has two network interfaces, see also Getting shell access. The main interface is the RJ45 gigabit ethernet port, which is configured as DHCP client per default. The micro-USB port can be used for network access as well, it should be recognized by your host as network adapter upon connection, please see below for details.
Gigabit Ethernet
The HemiStereo NX can be connected with a network using the Gigabit Ethernet port. By default, the interface is configured to request an IP address from a DHCP server. There are several ways to find out the IP address that was assigned:
1.Go to https://3dvisionlabs.com/downloads, download the HemiStereo Viewer and run it. The HemiStereo Viewer will automatically search for the device and display the device IP. Please note that UDP broadcasts must not be blocked by the network.
2. Connect a screen and keyboard or establish a connection via micro USB, log in and run the following command:
ip addr show eth0 | grep "inet\b" | awk '{print $2}' | cut -d/ -f1
If no DHCP server is running on your network, please choose another method and
reconfigure the ethernet interface to use a static IP. The devices uses the
NetworkManager for configuring its network. We recommend to use nmtui
for the static network configuration, as shown below.
The tool nmtui (network manager terminal user interface), can be used for a
guided configuration. It must be run with elevated privileges: sudo nmtui.
Please provide your sudo password if prompted, it is the same as for the
user account (e.g. hemistereo/hemistereo if unchanged).

Figure: start nmtui with elevated privileges
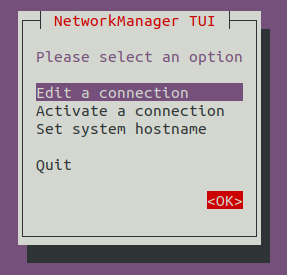
Figure: select “Edit a connection”, move the selection via the arrow keys and enter.

Figure: for the “Wired connection 1”, select “Edit…”

Figure: set the IPv4 CONFIGURATION
The IPv4 config must be set to manual (it is automatic per default) by moving the cursor there and hitting return, select “manual” from the submenu. Then enable the “Show” button on the right side and enter your connection details below. One address, the gateway and a nameserver are required. The address must include the netmask as well. It is encoded as /24 or /16 for most networks, which means 255.255.255.0 or 255.255.0.0 respectively. If no local nameserver is available, you could use (for example) the google public nameserver “8.8.8.8”. Hit “OK” when finished.
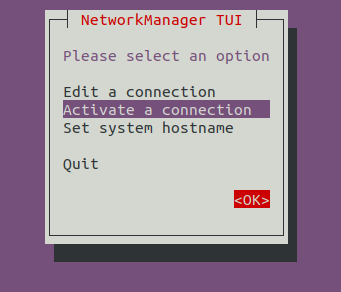
Figure: go to “Activate a connection”

Figure: find a connection with “* Wired connection 1” and hit “return” two times for de-activating and re-activating.

Figure: The new config should now be available.
Micro-USB (Automatic, Linux)
It is also possible to access the HemiStereo NX using the Micro USB port. Use a
Micro USB cable to connect the HemiStereo NX to your computer. It will
automatically create a new network device and the the IP 192.168.55.100
should be assigned automatically to this interface. The HemiStereo NX can now be
accessed using the IP 192.168.55.1.
Note
The connection over USB is much slower than over the Gigabit Ethernet port. You should only use it for initial setup or debugging purposes.
Warning
If the network interface does not get configured automatically, the sensor is not available throught ssh. In this case, please follow the instructions for “Micro-USB (Manual, Windows).
Micro-USB (Manual, Windows)
For Windows Hosts (and possibly for Mac OSX and certain Linux flavours), the virtual network interface created via connecting the micro-USB cable is not configured automatically. In this case, please find the interface in your “adapter settings” and set the following manual options:
Method |
Manual |
Address |
192.168.55.100 |
Netmask |
255.255.255.0 |
Gateway |
192.168.55.1 (may be empty) |
Note
For some Linux tools, e.g. “nmtui”, the netmask is not configured explicitely, but as part of the address, here 192.168.55.100/24 would be the correct option.
For Windows, please follow the following steps for configuring your device:
For the following configuration, you need local administrative privileges. First, go to the adapter settings of your system.
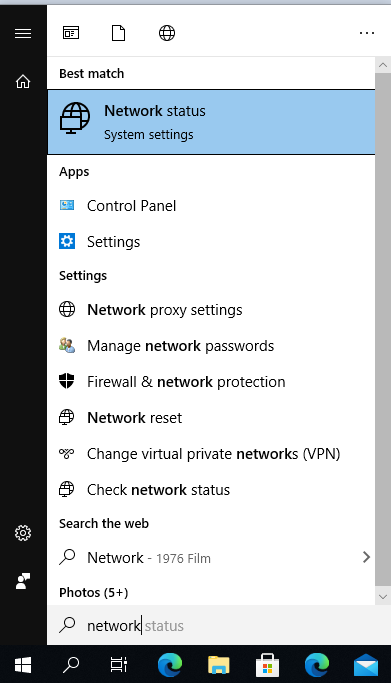

Figure: Micro-USB setup windows: open adapter settings
Select and open the adapter settings of the new / unconfigured network adapter. Here, it is “Ethernet 5” but the name is dependend on your physical system setup.

Figure: Micro-USB setup windows: select virtual network adapter and open settings dialogue
Enter the network adapter configuration dialogue and enter the “Internet Protocol Version 4” properties section. Here, enter the information from the table above (or manually transfer the info from the picture).


Figure: Micro-USB setup windows: select IPv4 settings and enter the network information manually
After applying the settings (clicking “OK”), the adapter will take a few seconds to get reconfigured.