HemiStereo Viewer
Warning
This document is work in progress and will be updated with the upcoming viewer version as some parts of the UI are changing and only the new functionality is documented.
The Stereo application is accompanied by a viewer application, which can be used on windows and linux hosts and is packaged as all-in-one executable.
It can be aquired from the download page.
After the download, make sure the AppImage file has executable permissions set, e.g.
chmod a+x Downloads/HemiStereo_Viewer-1.0.3-x86_64.AppImage
Connecting to sensor
The app starts into a connection view, as shown below:
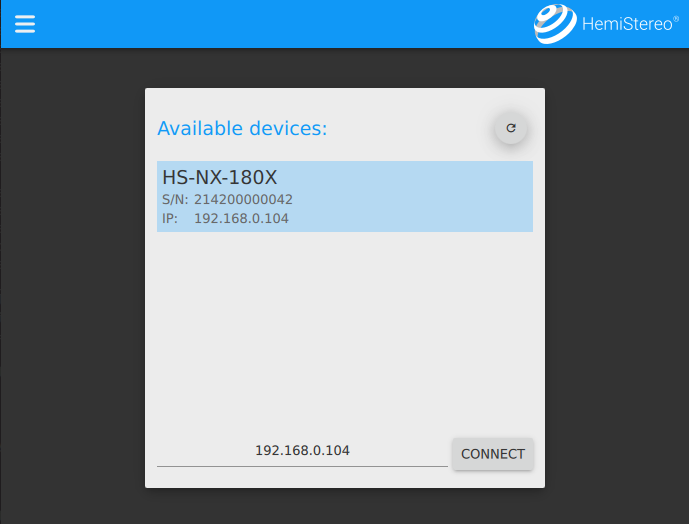
Connection view of the application, select the correct sensor
The sensors attached to your local network should be detected automatically. To proceed, select the appropriate sensor from the list and hit “CONNECT”.
Note
The sensors in your local network are auto-detected by UDP broadcast. Depending on the network settings and network topology, this might fail. If this is the case, enter the sensor’s IP manually into the text box.
Sensor version
The viewer is a front-end component without post-processing capabilities of its own. It only shows the images, depth information and point-cloud calculated on the sensor and received via network. For all setting and presented outputs to work correctly, the sensor software (mainly the stereo-backend) and the viewer version should be updated together.
If the backend version is too low for the current viewer software used, the following warning message will inform you upon connection:
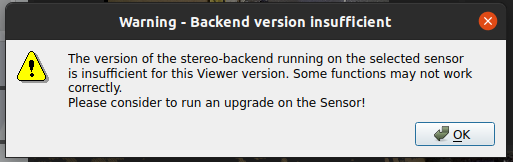
The sensor is running an older version of the stereo-backend, which leads to missing controls in the viewer software.
Main view
The main view area is built up of a couple of elements:
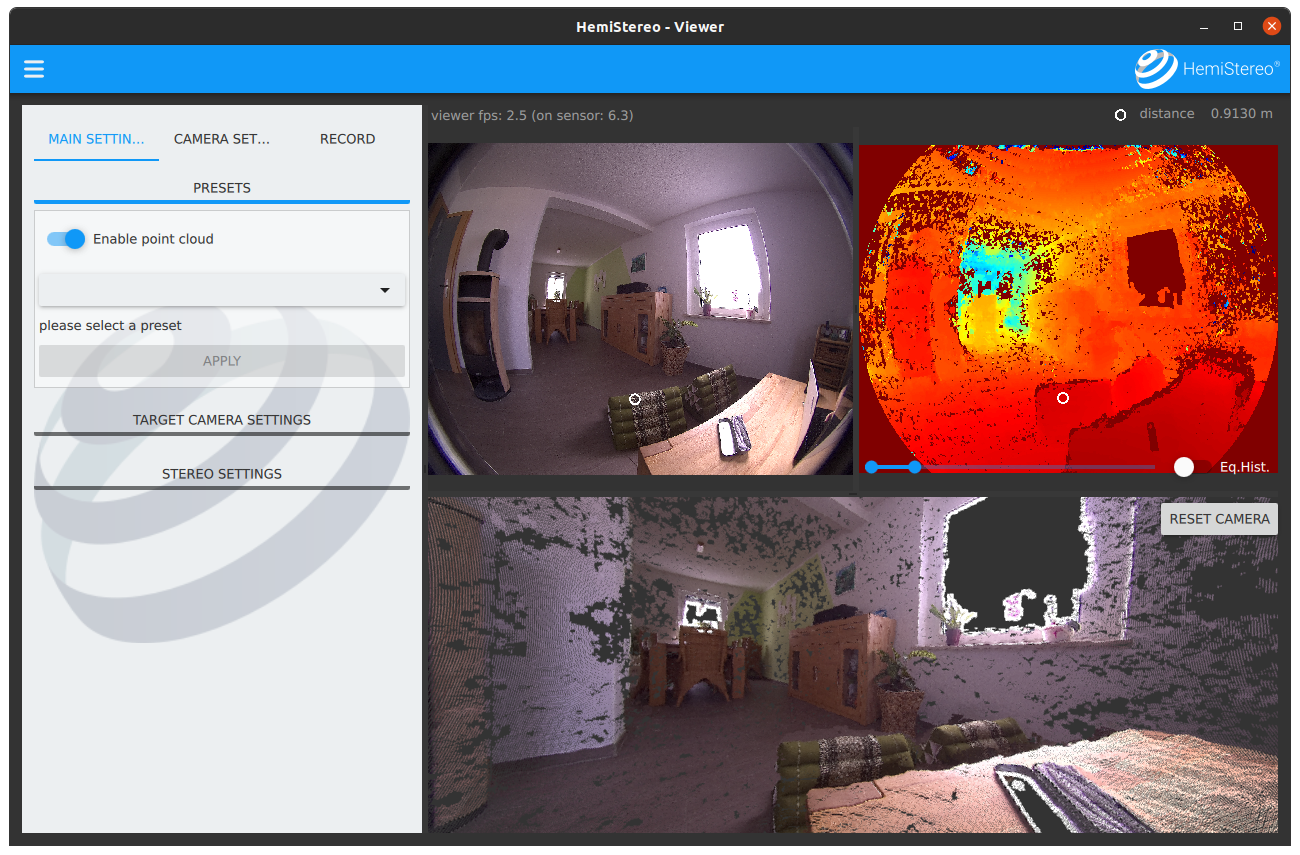

The main view consists of serveral easy-to-reach elements. The point cloud rendering can be deactivated for faster network transmission speeds.
- view area
usually split into two or three panes, showing (clock wise order) the rgb image from the sensor, the distance map and (optionally) the point cloud 3D rendering.
- main menu
which makes several controls of the stereo pipeline available to the user
- status bar
above the images, showing: (left) the current frame-rate of the viewer software (as the data is received over the network) and in braces, the current framerate, which is processed on the sensor for downstream image processing; (right) the distance of the point under the cursor, when hovered over either the rgb or distance image, the white circles in the rgb and distance images are syncronized to the same location, the distance is measuered for the single pixel in the center of the circle.
- window menu
in the far top-left corner, containing options for disconecting from this sensor, reading the about / license information and quitting the software
Menu
Here, an overview of the main menu is given with some hints on the most important options and caveats. First, have a look at the main menu:

The main menu is seperated into three tabs (1 - main settings, 2 - camera settings and 3 - recording) and collabsible sub-menus (4).
Main Settings
The main settings tab consist of three sub-menus for preset selection, target camera settings and stereo settings.
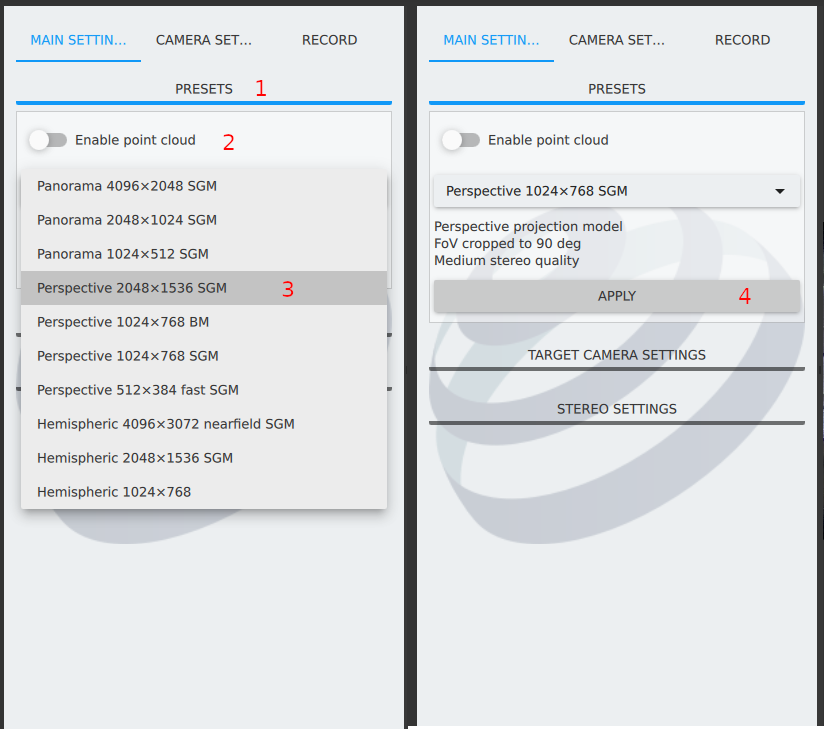
The preset selection (1) has two functionalities: (2) the point cloud rendering can be switched on and off here on prominent position. Also, (3) an presets can be easily applied by selecting one item from the combo-box and clicking (4) apply.

The target camera settings (1) control the presentation of the image. The raw images are mapped into a new camera model which reduces distortion and allows for controlling the presented image size independed from the stereo matching image size.
First, a projection model (2) can be selected via the combo box. Some of the sliders in the main menu have “Lock aspect ratio” toggles, e.g. (3), which can be used to keep a certain ratio between both slider values below. The target camera image size (4) is an independend setting, affecting the presentation quality and the framerate of the viewer. The number of points in the point cloud rendering is also affected by this setting. Finally, the field of view (5) setting is initialized to the sensors maximum. Changing this value also affects the stereo matcher.
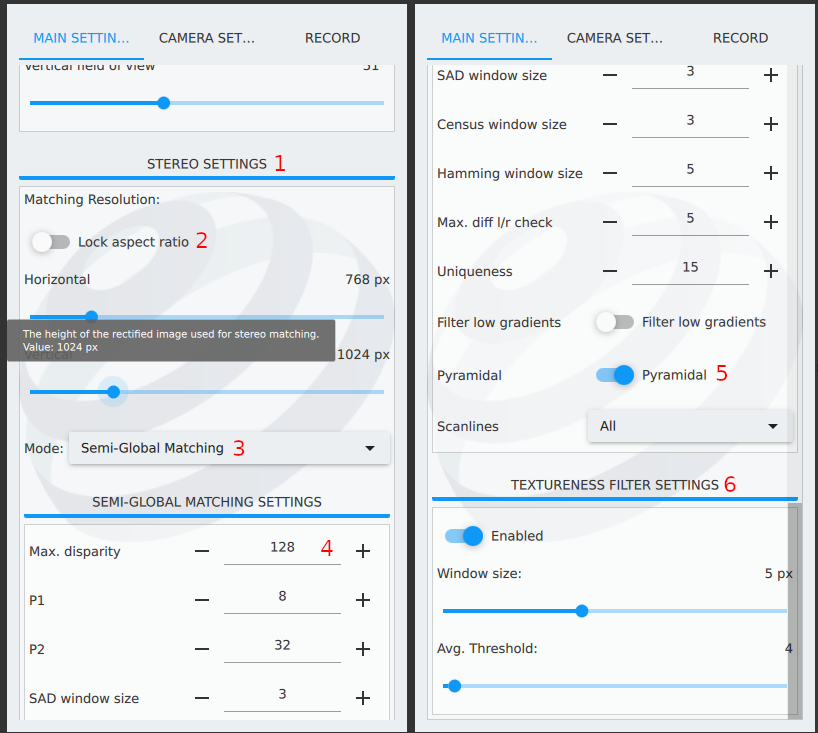
The stereo settings (1) consist of several sub-menus itself. The two main options are the stereo matching resolution (2), which is important for the depth map quality but also operation speed in terms of frames per second. The stereo matching mode (3) can be used for selecting the (default) semi-global matching, which is costly but yields very high depth quality. The block matching algorithm is only included for reference. It is very lightweight and fast. For using it in production, some effort is still necessary in terms of post filtering. Finally, the deep neuronal network is an experimental feature, which replaces the numerical matching algorithm with a trained AI. It actually yields pretty good results, but we did not test it in production yet. The stereo matching resolution cannot be controlled for the DNN solver, as it is trained for a specific input-layer size.
More detailed options are (5) the maximum disparity. It controls the maximum triangulation distance of the stereo pixel-pair and thus is important for the near-field detection boundary. Objects close to the sensor are far apart in both pictures and require high values here. It has an significant impact on the performance. The stereo matching should always be carried out using the (5) pyramidal matching scheme. Please leave it switched on, this makes the matcher faster and consume less memory. Finally, (6) the textureness filter can be applied to filter out all image areas with low texture. Missing texture is bad for all stereo matching algorithms. Stereo matching results of very even surfaces are not usable by default, so filtering these ares by their image texture is a good decision. Esp. the avgeraging threshold can be used to control how much of the image is filtered out. If your application includes such problematic surfaces, please contact us, there are options available for improving the stereo matching quality of low-texture objects.
Camera Settings
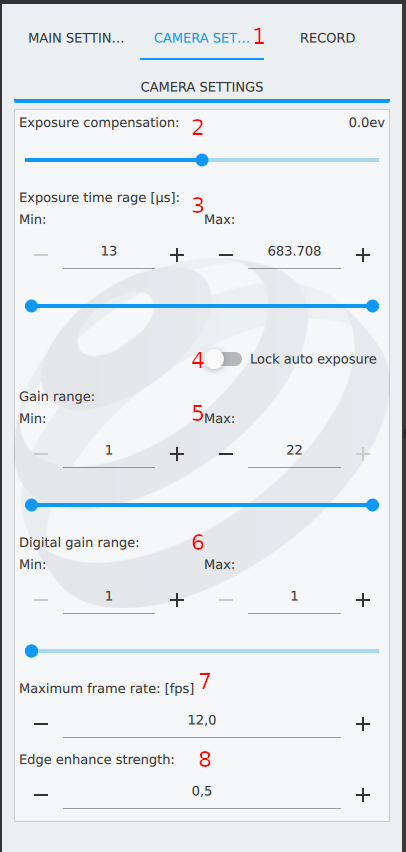
The camera settings tab (1) has only one sub-menu. It controls the bahviour of the imagers, the options are comparable to other digital system cameras:
The exposure compensation can be used for manually forcing over- or under exposure of the image. This is useful if the area of interest is only “filling” a small portion of the image and the automatic control is not satisfying. Example: taking an image of the moon in front of a dark sky, the auto controls would try to evenly light the sky, while the small moon gets highly over-exposed. Here, a negative exposure compensation helps.
The exposure time range, in which the automatic controll may work. Higher values result in less noise but high motion blur. Depending on your application (dynamic scenes), this is dictated by the motion speed rather than by the image quality.
The automatic control of the exposure timing can be locked to the current value.
The analog gain range sets the sensitivity of the imager chips. Higher values yield brighter but nosier images. It is comparable to the ISO value of system cameras.
The digital gain range is comparable to the analog gain, but applied on the binary image data, which introduces a lot of noise if enabled.
The frame rate usually is following the auto-control settings but can be capped as well.
Computer vision applications often need to identify the edges of objects and spaces, the edge enhancement overamplifies gradients in the image and leads to more distinct edges.
Record

The record tab (1) has only one sub-menu. Here, the folder (2) where the recorded files shall be stored can be entered (or selected by clicking the ellipsis ‘…’). The desired output channels can be selected by (3) checking the respective boxes. Finally, (4) the recording button toggles the actual recording run.